It has been quite some time since I made the last post on my blog. Life had been busy with travel and work.
I have now relocated to London, UK and am still working on MS CRM, gaining a good experience on the wealth management domain. Looking forward to the CRM 2011 version with some great enhancements and features that had been missing.
Wishing all a very happy and prosperouse New Year, with a resolution to try and keep my blog more active with various snippets and updates.
God bless...
Thursday, December 30, 2010
Wednesday, July 8, 2009
CRM 4.0: Increasing Page Limit for CRM Grid Views
The number of records displayed on the lookup, or for that matter any view that displays the grid has a Paging Limit to it, which can be configured for each user from the Workplace->Personalize Workspace.
The maximum value available in Workplace however is only 250. Once this value is set to 250, the number of records per page in the lookup, and all other views will be 250 records.
However, there is a workaround to increase this Paging Limit for any user from the Database.
You can use the following query to set the value to say 1000.
UPDATE UserSettings SET PagingLimit=1000 WHERE SystemUserId IN
(Select SystemUserId from SystemUserBase WHERE FullName like 'Ashish%')
This will display 1000 records per page in views and lookups.
Cheers!
Friday, July 3, 2009
Thursday, July 2, 2009
CRM 4.0 Import Data Wizard: Now Updating Records is Possible
In Microsoft Dynamics CRM 3.0 there existed an option to update records when using the built-in Import Data Wizard. This was an extremely useful feature; we could export thousands of rows to Excel directly from CRM, update the information using Excel tools (such as Find and Replace), and then import this enriched data back into CRM. This would update our existing records rather than creating entirely new records.
This feature was in the beta versions of CRM 4.0, but when final release came around, this feature was nowhere to be found; a victim of the final cut. It was a perplexing omission, as all documentation and help files related to the Import Data Wizard mentioned the ability to update rather than create new. The Data Import Wizard could now only be used to create new records, which made any type of bulk update a near impossible task.
The surprising news is that you can still use this non existing feature. How? Here is an example:
In this example scenario, I want to update all my contacts with new data: email address.
1. Select an existing view or edit a new view using the Advanced Find. Make sure the columns you want to add data to are included in the view.

2. Export the view data using the ‘Export to dynamic worksheet’ option and save it.

3. Open the exported file, select all records, go to the Format menu, select Column sub menu and then the Unhide option. A new column should appear, containing the records GUIDs.


4. Rename the GUIDs Column to the name of the exported entity for example ‘Contact’. Move the column to the left of all other columns.

5. Update the required data. In this example, the email data is added to the existing records.

6. Save the Excel file as .csv file.
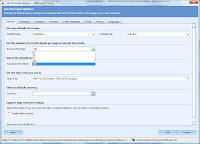
7. Use the Import Wizard tool in Microsoft Dynamics CRM 4.0 to import the newly created .csv file. Select ‘none’ for Data Delimiter, ‘Comma (,)’ for field Delimiter.

8. Click next and select the exported entity, ‘Contact’ in this example. You can see the ‘Enrich data by updating records rather than creating new records.’ option available and checked. Select a data map if required and click next

9. Check the ‘Import duplicate records’ option and click next

10. Complete the import process.
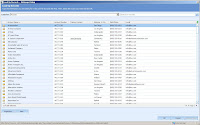
11. Go to the workplace and open the data import section. Once the data import job is done, open the the job records and see which records were updated. Notice that existing records were updated, no new records were created.
12. Finally, refresh the view you started with to see the updated data for the existing records.

Thanks to Yaniv for detailing out these steps. You can view his blog link at
http://blogs.microsoft.co.il/blogs/rdt/archive/2009/05/12/how-to-use-the-data-enrichment-re-import-feature-in-microsoft-dynamics-crm-4-0.aspx
Cheers!
This feature was in the beta versions of CRM 4.0, but when final release came around, this feature was nowhere to be found; a victim of the final cut. It was a perplexing omission, as all documentation and help files related to the Import Data Wizard mentioned the ability to update rather than create new. The Data Import Wizard could now only be used to create new records, which made any type of bulk update a near impossible task.
The surprising news is that you can still use this non existing feature. How? Here is an example:
In this example scenario, I want to update all my contacts with new data: email address.
1. Select an existing view or edit a new view using the Advanced Find. Make sure the columns you want to add data to are included in the view.
2. Export the view data using the ‘Export to dynamic worksheet’ option and save it.
3. Open the exported file, select all records, go to the Format menu, select Column sub menu and then the Unhide option. A new column should appear, containing the records GUIDs.
4. Rename the GUIDs Column to the name of the exported entity for example ‘Contact’. Move the column to the left of all other columns.
5. Update the required data. In this example, the email data is added to the existing records.
6. Save the Excel file as .csv file.
7. Use the Import Wizard tool in Microsoft Dynamics CRM 4.0 to import the newly created .csv file. Select ‘none’ for Data Delimiter, ‘Comma (,)’ for field Delimiter.
8. Click next and select the exported entity, ‘Contact’ in this example. You can see the ‘Enrich data by updating records rather than creating new records.’ option available and checked. Select a data map if required and click next
9. Check the ‘Import duplicate records’ option and click next
10. Complete the import process.
11. Go to the workplace and open the data import section. Once the data import job is done, open the the job records and see which records were updated. Notice that existing records were updated, no new records were created.
12. Finally, refresh the view you started with to see the updated data for the existing records.
Thanks to Yaniv for detailing out these steps. You can view his blog link at
http://blogs.microsoft.co.il/blogs/rdt/archive/2009/05/12/how-to-use-the-data-enrichment-re-import-feature-in-microsoft-dynamics-crm-4-0.aspx
Cheers!
Wednesday, July 1, 2009
CRM 4.0 Lookup: Retrieve Column values from Lookup window
There are times when you need to retrieve some values from the parent record, on the selection of the lookup value. In such a scenario, you can retrieve all column values of the lookup window using the following script:
Example: Order Form - Customer Field OnChange event
if(crmForm.all.customerid.DataValue != null)
{
var parentCustomerID = document.getElementById( "customerid" );
var lookupItems = parentCustomerID.items[0].values;
alert(lookupItems[0].value); // First column value of Lookup
alert(lookupItems[1].value); // Second column value of Lookup
alert(lookupItems[2].value); // Third column value of Lookup
alert(lookupItems[3].value); // Fourth column value of Lookup
alert(lookupItems[4].value); // Fifht column value of Lookup
alert(lookupItems[5].value); // Sixth column value of Lookup
}
This will display the Contact's 'Full Name', 'Parent Customer Name', 'Address 1: City', 'Address 1: Phone', 'Business Phone' and 'Email' values from the selected Contact (Default Contact Lookup View). If you select an Account, this will display the 'Account Name', 'Account Number', 'Primary Contact', 'Address 1: City', 'Main Phone' and 'Email' values from the selected Account.

The lookupItems array will hold all the values in the same sequence as defined in the Lookup View.
You can now add your required values in any lookup view and retrieve the same without making service calls.
Note: You should disable the Automatic Resolution, so that users cannot add values automatically. This script will work only if the Lookup View is loaded.
Feel free to reach out in case of any issues/queries in this regard.
Cheers!!!
Example: Order Form - Customer Field OnChange event
if(crmForm.all.customerid.DataValue != null)
{
var parentCustomerID = document.getElementById( "customerid" );
var lookupItems = parentCustomerID.items[0].values;
alert(lookupItems[0].value); // First column value of Lookup
alert(lookupItems[1].value); // Second column value of Lookup
alert(lookupItems[2].value); // Third column value of Lookup
alert(lookupItems[3].value); // Fourth column value of Lookup
alert(lookupItems[4].value); // Fifht column value of Lookup
alert(lookupItems[5].value); // Sixth column value of Lookup
}
This will display the Contact's 'Full Name', 'Parent Customer Name', 'Address 1: City', 'Address 1: Phone', 'Business Phone' and 'Email' values from the selected Contact (Default Contact Lookup View). If you select an Account, this will display the 'Account Name', 'Account Number', 'Primary Contact', 'Address 1: City', 'Main Phone' and 'Email' values from the selected Account.


The lookupItems array will hold all the values in the same sequence as defined in the Lookup View.
You can now add your required values in any lookup view and retrieve the same without making service calls.
Note: You should disable the Automatic Resolution, so that users cannot add values automatically. This script will work only if the Lookup View is loaded.
Feel free to reach out in case of any issues/queries in this regard.
Cheers!!!
Thursday, May 28, 2009
Implementing Title Case using Java Script
Today I recieved a query to implement title case for the name fields in CRM.
This can simply be achieved by writing a custom Java Script method as below:
Add this code on the OnChange event of First Name attribute in Contact:
// JScript source code - TitleCase
var strTitleCase
var str = crmForm.all.firstname.DataValue
str.Substring(toUpperCase();
if(str != null)
{
strTitleCase = toTitleCase(str);
crmForm.all.firstname.DataValue = strTitleCase;
}
function toTitleCase(str)
{
return str.replace(/\w\S*/g, function(txt){return txt.charAt(0).toUpperCase() + txt.substr(1).toLowerCase();});
}
Wednesday, May 13, 2009
Setting up the Product Catalog
Hi All,
It is sometimes really confusing to setup the product catalog in MSCRM, how the current prices are calculated in the quotes depending upon the discount lists, unit groups and price lists
So, hoping this article will be beneficial in clearing doubts.
Product catalog Consists of 4 areas:-
- Discount List
- Unit Groups
- Price lists
- Products
*** It is recommended, to set up the areas in the order Listed.
Discount List
It allows discounts to be given based on quantity.
Discount list items can be set up as:
Beginning Quantity Ending Quantity Percentage Discount 1,000 5,000 3.50 5,001 25,000 5.00 25,001 100,000+ 7.50
You can create as many discount lists as necessary and, although not required, associate them with different price lists and price list items.
Unit Groups
The typical example of unit groups is a can of soda. It is possible to purchase a single can, a 6-pack, and a case consisting of 12 or 24 cans, etc.
Each of these quantities consists of a primary/base unit. For example list items can be set up as:
Name Base Unit Quantity Single Single 1 Small Pack-6 Single 6 Large Pack-24 Small Pack-6 4
Unit Groups are associated with products, as well as the default unit for the product.
Price List
Price lists make up groupings of products with associated pricing lists (like Standard Price list, default price list, or similar).
Each price list item can be associated with a product of a specific unit group item and a specific discount list as chosen.
Pricing method field in the price list item form decides how the price for a particular product will be calculated.
Pricing method options:
- Currency Amount
This option uses a fixed amount.
- Percent of List
This option uses a percent of the list price.
- Percent Markup - Current Cost
This option uses a percent of the markup on the product's current cost. The percent markup can range from 0 to 99,999.99 percent.
- Percent Margin - Current Cost
This option uses a percent of the margin on the product's current cost. The percent margin can range from 0 to 99.99 percent.
- Percent Markup - Standard Cost
This option uses a percent of the markup on the product's standard cost. The percent markup can range from 0 to 99,999.99 percent.
- Percent Margin - Standard Cost
This option uses a percent of the margin on the product's standard cost. The percent margin can range from 0 to 99.99 percent.
Amount
If you selected Currency Amount from the Pricing Method list, type the amount. This is a monetary amount and must be a number between 0.00 and 1,000,000,000.00
Percentage
If you selected any value from the Pricing Method list other than Currency Amount, type the percentage for the pricing method that you want
Product
Each product can be associated with price lists, a unit group and a default unit.
So, when we use a particular product in any form, we can extract the product information like current associated price depending up on the price list which in turn is associated with the default unit of a particular unit group and also on the discount list (depending up on the quantity).
Below are the essential pricing values that are provided during the set up of a product:
List Price
This is a monetary amount that is based on the list or sales price
Standard Cost
This is a monetary amount that is based on the typical cost of the item.
Current Cost
This is a monetary amount that is based on the current or temporary cost of the item.
Note: Depending up on the pricing method selected while creating price list item for a particular product and the above mentioned prices of the product, the total price value for the quote, order, and invoice is calculated.
Example: Consider a product of current cost $1000. The pricing method selected in the associated price list item is “Percent Margin - Current Cost “and the percentage field value is 10%. So, when a quote is created with this product as the quote product, the total price for the quote is calculated from the above mentioned details. For e.g. If the ‘unit’ selected is the primary unit (one) and the quote quantity is 1, the calculated price value becomes:-
10% of $1000 + $1000 = $1100.
If any discount is there in the discount list, associated with the product, it will be discounted from the above mentioned total price.
Subscribe to:
Posts (Atom)
